Why Commodore 64 games look Like That, and some sprite multiplexing
As one of the computers of all time, the Commodore 64 sure has a distinctive look. If you know what to look for it’s often easy to tell when a game was made for the C64. The color palette is an obvious key indicator, but it’s more than that. A lot of game graphics look kinda stretched out, or sometimes chunkier than they should given the resolution. Why is that?
One of the C64’s most characteristic limitations is related to color. Besides only having 16 of them, we’re also limited in how we can use them. Let’s say we have a sprite. All sprites are comprised of 63 bytes (and an extra padding byte) for a resolution of 24x21 with 1 bit per pixel. So that’s 3 bytes (24 bits) per row, and 21 of those rows. Each bit in those bytes determines whether a pixel will be transparent or use the sprite’s designated color. Here’s how one of those sprites can look, drawn in a custom sprite editor program:
![]()
Not bad, but not really ideal for more advanced games. You typically don’t want your characters to be see-through like that, and if you fill it in it just kinda looks boring. That doesn’t look very good for most types of games. It’s awfully convenient though, the bit patterns map directly to pixels so you just have to poke in the bits you want. That sprite editor was extremely easy to make. So that’s nice, but this still isn’t suitable for characters. But don’t worry, there’s a solution. High-color mode!
This mode gives us two more colors, which are globally selected via the two auxiliary sprite color registers, rather than being sprite-specific like the primary color is. The caveat is that the sprite stays the same size, both in memory and on screen. There’s no spare space to put any color, so we need to drop the resolution somehow. So let’s see how the video chip deals with that. If we simply turn on high-color mode with our previous hot air balloon sprite it certainly adds color…
![]()
…but now every pixel is twice as wide as it normally is. The bits no longer map directly to pixels, instead it’s takes two bits to make a pixel for four possibilities: transparent (00), primary color (10), auxiliary color 1 (01), or auxiliary color 2 (11). Since we’re using the same amount of memory to represent a deeper image, we’re going to need to drop the resolution, but instead of cutting the sprite’s width in half the video chip just doubles up each pixel.
This compromise requires that we draw all graphics with this stretch in mind, and here I’ve redrawn the hot air balloon to fit.
![]()
This one doesn’t look much like a hot air balloon, but blame my non-existent art skills for that. I’m sure a real artist could have made it look okay. And hey, if you really need square pixels, you could always just enable the double-height mode. It will get chunky though. In the pictures above I have double-height and double-width mode enabled already so I don’t need to get uncomfortably close to the monitor to tell what my sprites look like. I’ll show some regular sized sprites in a bit.
Similar behavior also applies to high-color backgrounds, although with some other caveats and capabilities. Although it looks a bit strange, these double-width pixels are undeniably a key part of the Commodore 64’s aesthetic and certainly adds to the charm.
Part 2: I want Ralsei Deltarune to live in my text editor.
To make a long story short, I watched a video about the use of sampling in video game music and accidentally fell head first down the Undertale/Deltarune rabbit hole that I had been so skillfully avoiding for almost a decade. Now Ralsei is somehow one of my favorite characters ever and as of September 2024 I have yet to figure out why.
No seriously, don’t know why I like him so much, this doesn’t usually happen to me. Send help(?).

My love of Ralsei collided with the Commodore 64 when the reason I get out of the house, KTH’s computer club Stacken, bought a power supply for our previously decorative Commodore 64. I don’t want to take credit for this, but me digging out the old VT220 terminal probably accelerated the decision a bit. Once we got it up and running (and got an SD2IEC floppy drive emulator because my hacky data transfer solution failed) I immediately got to writing programs for it. First up was a pong clone.
My only previous 6502 assembly experience was with the NES, which has its V-Blank signal tied to the Non-Maskable Interrupt (meaning a routine of the ROM’s choosing gets called at the end/beginning of each frame via a hardware signal), making it nice and convenient to put your game logic in the NMI routine for really simple games (this typically doesn’t scale but is convenient at first). Since humans are typically drawn to familiarity, I wanted to do this on the C64 as well. I ended up writing a pong clone that’s entirely interrupt driven.
When it starts up it installs its own IRQ routine from which it runs game code and, most critically, passes along control to the operating system’s normal IRQ routine after it’s done. The IRQ was then tied to the video chip’s raster interrupt so that the interrupt fires once per frame at a scanline of the program’s choosing, which felt close enough to a V-Blank interrupt. After installing the IRQ and setting up the game, the program just goes into an infinite loop so nothing happens while we’re waiting for a V-Blank.
I can’t remember if it was by intentional experimentation or by
accident, but at some point I replaced the idle loop in the pong program
with a return instruction, and watched as the game ran on top of BASIC.
As in literally on top, the paddles and ball were moving around in front
of the text layer as I typed and ran code. In that instant I knew that I
wanted to have a character of some kind walking across the screen as you
write BASIC code. For about a second I considered Mario
non-copyright infringing human but let’s be honest, it was always gonna
be Ralsei.
Let’s have a look at an original Ralsei sprite and see what compromises we’ll have to make.

First we’ll have to map him to the C64’s palette. This is best done manually, but works out fine, no important color is missing and the different colors look fine on him.

So uh, when I started doing this I forgot I couldn’t have as many colors as I want. Ralsei simply won’t fit in a pair of high-color sprites. He was drawn in modern graphics software for use in a modern game engine, his pixels don’t align on two-pixel boundaries, and I’m not artistically competent enough to redraw him. I’m not even sure that would work at all. It would either require completely changing the art style or making him really big. Plus, he has a few more than three colors on him.
Instead of doing what I normally do and giving up to do something else, I remembered a trick I had heard was common on the MSX computers. The early MSXs didn’t have any equivalent to the C64’s high-color mode sprites (as far as I know), and so what MSX developers would do instead is simply overlap several sprites, one for each color. Later versions of the MSX standard even added features to make this trick more useful, letting overlapping sprites have their colors bitwise OR’d together (and also added more color flexibility in general but I don’t know enough about that to say anything without ending up a liar).
The problem is, the MSX had 32 sprites, and the Commodore 64 only has 8. That feels reasonable since we only need one Ralsei (though I would obviously welcome more), but Ralsei is 40 pixels tall and a sprite is 21 pixels tall. His upper half takes six colors and his lower half takes seven colors. That doesn’t sound like it’ll work out. It’s not hard to write a program that does half the job, so let’s look at that at least.
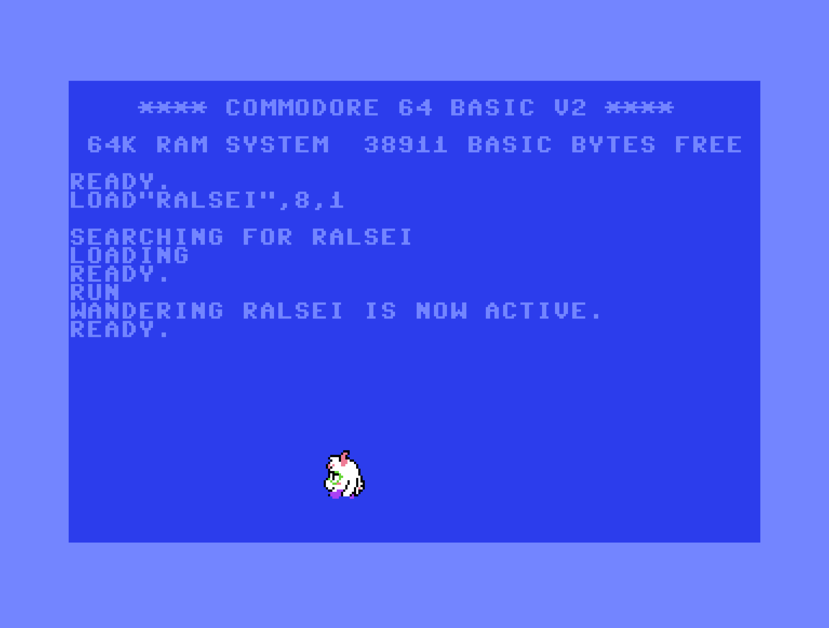
Well that’s literally half right. At least the idea of layering sprites for more colors worked. But that’s still just half the guy, and we don’t have enough sprites to draw the rest of the goat. If only there was a way to create the illusion of more than eight sprites…
Part 3: The RASTER register
The Commodore 64’s video chip, the VIC-II, has a register called RASTER. When you read from it, it returns the current line that the VIC-II is drawing to the screen. Remember, CRT TVs draw the image one line at a time, and the video signal comes in as it’s drawn. That is to say, what comes over the wire gets put onto the screen as it’s coming over the wire.
To really hammer this point home, here’s a slow motion video of a CRT display in action (photosensitivity warning: it flashes a bit).
https://www.youtube.com/watch?v=bHz0hqtAOSs
The position of the bottom edge of that line is what the RASTER register contains.
So if we know where on the screen we are, we can change things as the image is being drawn to create various effects. Let’s write a program to test that.
The VIC-II gives us a register that controls the background color. When the computer boots up that’s this blue that makes for a really low contrast with the also blue text. We can change this and the video chip will simply draw that color instead for the background.
Let’s have the program wait for the video chip to reach line 0 and then set the background color register to a color of our choosing. Then we’ll wait for the video chip to reach a line the number of which we’re storing in a variable (skipping out on self-modifying code for simplicity’s sake), and set the background color register to a different color. After that we’ll jump back up to the start, once again waiting for line 0.
Doing that gets us this:
https://www.youtube.com/watch?v=Quqe7sbO0Nk
Click here to see the code!
        sei                       ;turn off interrupts
top_loop:
        lda RASTER                ;check the raster
        bne top_loop              ;if it's not zero, loop

        lda #$1                   ;1 = white
        sta BGCOL0                ;set background to white

bottom_loop:
        lda RASTER                ;check the raster
        cmp bottom_line           ;compare it to bottom_line variable
        bne bottom_loop           ;if not equal, loop

        lda #$4                   ;4 = pink-ish(?)
        sta BGCOL0                ;set background to pink-ish

        inc bottom_line           ;increment line counter

        jmp top_loop              ;loop

bottom_line:
        .byte $80                 ;default value is 0x80
And because I can’t resist, let’s see some slow motion footage of this one too. You can actually see the raster line at which we change color go down one line every frame.
(Maybe I’m the last person to hear about this but I recorded that on my phone and I am very impressed with how it turned out. I didn’t know phones could record slow motion video this good.)
Could we do the same thing with sprites? Let’s try it out on our half Ralsei program. Instead of manually waiting for the right line, we’ll set the RASTER interrupt to fire on the line right below the bottom of Ralsei’s top sprite, and once it fires we’ll simply change the Y coordinates of all the sprites to move them down 21 pixels. We’ll also change the graphics data for those sprites. And… nothing happens, it looks exactly the same as it did before. That’s because the video chip prepares each line’s sprites before it starts drawing the line, so by the time the interrupt fires it’s already decided that there’s no sprites to draw. Setting up a sprite’s first line is required to have it display the rest of its lines, so we get nothing on the subsequent lines either.
So let’s move it up by one line, that should do it.
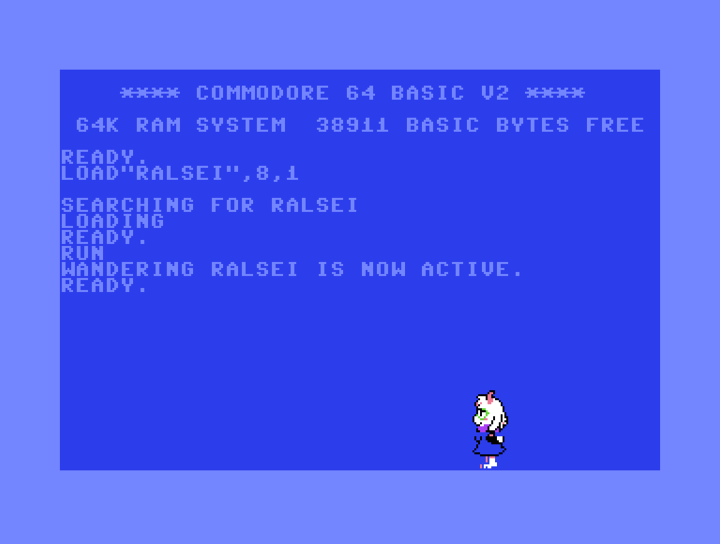
That… kinda half worked. But it seems there’s not enough time here. From a little reading it turns out that you can change the sprite’s position immediately after its first line has been drawn, since that’s “cached” (for lack of a better word, nuance etc.) in the video chip, but the sprite’s graphic has to be changed after the top sprite is drawn, because that isn’t cached, if you change it too early then the top half will get some of the bottom half’s graphics.
But then… how do we make the two sets of sprites line up? Are we screwed? Am I just going to have to accept that Ralsei can’t live in a Commodore 64? Luckily, no. Let’s see what happens when I set the interrupt to occur just one line after the top of the upper half.
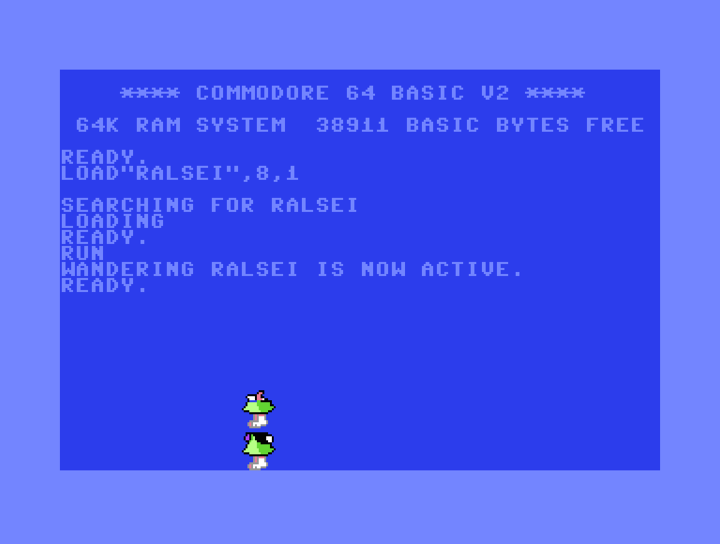
Note: This might not actually be what it looked like, I procrastinated and had to make most of the pictures afterwards. I think this is accurate but can’t guarantee it.
Aha, it takes time for the sprite’s picture to change! This especially makes sense since the CPU is a good bit slower than the video chip, but if that was all then surely it would start drawing the upper sprite’s graphics before switching over partway down. There’s probably some other factor involved but I’m not even going to speculate on why it behaves like this. What matters here is that it does.
Counting how many lines we get there, and assuming that the glitchyness comes from changing the picture in the middle of a sprite being drawn, we can say that we have a circa 5 line delay to changing all the sprites. Giving the interrupt a five line head start gets us pretty close…
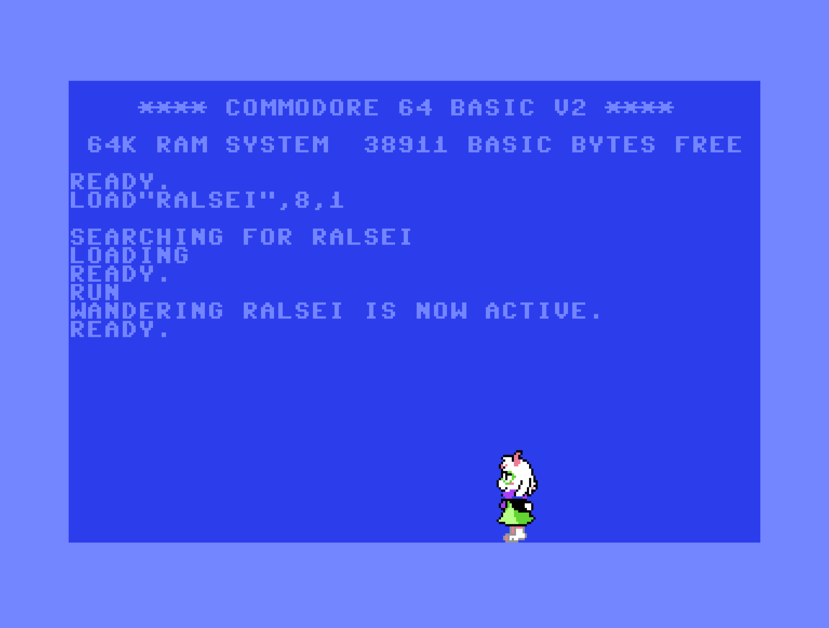
…but not quite there. One of the lines is flickering transparency. Trial and error shows that 3 and 4 lines work fine, and this is where I’m going to have to say “I don’t know”. I don’t know why that’s the magic number and without counting every cycle my program takes and comparing the the video chip’s speed I don’t think I’m gonna find out.
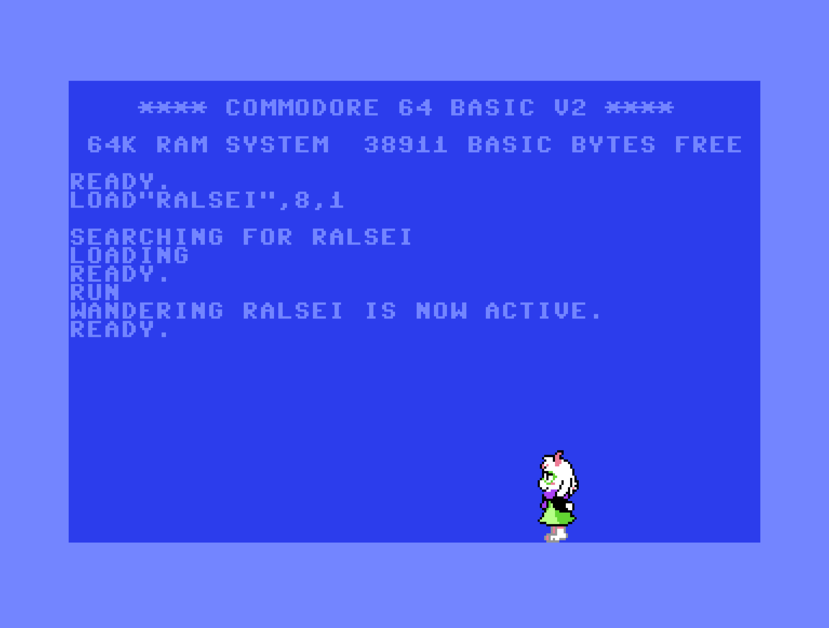
Well let’s make him walk then! Moving him around isn’t hard, we just decrement the sprites’ X positions once per frame and handle the most significant bit of the X coordinates when necessary (since on the C64 sprite positions are 9 bits long, with the MSB in a separate register). Then to be nice we check if Ralsei is behind the border and move him to the other side so we don’t have to wait for it to naturally wrap.
Animating him is a bit harder.
We just barely have time to do everything as it is. In fact, we don’t actually get done in time, but more on that later. If we have to load sprite image numbers out of a table via a pointer and store them into the right places then we’ll fail to finish in ways that are actually visible. So for maximum speed, we’ll need to hard code it. While we could simply have one hard coded routine per half sprite, that seems like a bad idea, especially on a computer with very real memory limitations (and is also boring).
Part IV: Self-modifying code
The solution I landed on was having one hard-coded “set lower half sprites” routine that gets altered whenever the animation advances a frame. (The code resetting to the upper half can simply copy through a pointer since it has way more time to spare.)
But before we get to that…
Section 4.2: The 6502’s LDA instruction
If we’re going to be modifying instructions we should know how they
work. Luckily the 6502 is one of the eightest bit 8-bit processor
around, and instructions don’t have any real format (as far as the
programmer is concerned). The instruction we care about,
LDA, is simply its opcode followed by its operands. In the
case of loading an immediate the operand is one byte and is the value
that gets loaded.
So say we want to replace 1, 2 and 3 here.
first_inst:
        LDA #1
        LDA #2
        LDA #3
We start off with a pointer to first_inst + 1, which is
where the first operand #1 lives. Then for each step
forward we add 2 to it to get to the next operand. But we don’t have a
series of loads, we have a series of load/store pairs. Luckily that’s
not a problem. The STA instructions we’ll use are three
bytes in length, so just add 5 instead of 2 for each step.
Alright let’s go back up to Part IV again.
The “original” version of this routine will be hard-coded to load the lower half of the standing sprite.
load_lower_half:
        lda #$d8                ; this instruction is two bytes
        sta [...]               ; this one is three bytes

        lda #$d9                ; in an LDA immediate, the second...
        sta [...]

        lda #$da                ; ...byte is the operand.
        sta [...]

        lda #$db
        sta [...]

        lda #$dc
        sta [...]

        lda #$dd
        sta [...]

        lda #$de
        sta [...]
We’ll increment a frame counter every time we load the upper half,
and when it goes over a certain value we’ll change which animation frame
we want. The top half code can do this however it wants, it’s not super
time sensitive, but on top of loading the top half sprites, it will also
alter the load_lower_half routine.
Click here to see the code!
swapframe:
        ldx #0
        ldy #1
        lda frame
        eor #%11111111 ;negate frame
        sta frame
@loop:
        lda frame
        beq @walk
        lda standptrs,x
        jmp @cont
@walk:
        lda walkptrs,x
@cont:
        sta load_lower_half,y
        .repeat 5
        iny
        .endrep
        inx
        cpx #7
        bne @loop
        rts
Just one more thing
So even with this, Ralsei still has one more problem: the top line of his bottom half doesn’t finish switching all its sprites in time, so the scarf becomes transparent.

We can fix this simply making sure to update the purple sprite earlier. I made it the 3rd to update and it works fine. And now, the result: